Letter Writing and Stationery

P3252564.jpg
P3252565.jpg
P3252566.jpg

As a child, I’d always got a little Basildon Bond writing set on the go; my favourite was a very pale blue paper with matching envelopes. I had a few penpals and loved to both send and receive happy mail. I used to copy illustrations from my books - most notably my Garfield comic books and a heavily illustrated copy of The Secret Diary of Adrian Mole. I would send my drawings to friends alongside a letter, often with a page of lyrics to songs that I had carefully copied down from Smash Hits! magazine. I sent mix tapes and scented stickers. Photos of Philip Schofield torn from magazines (my friend had an enormous crush on him) and I would often send one of those ‘chatterbox’ origami games.

Adulthood arrived in a flurry of driving lessons, Peach Schnapps and clubbing, so whilst I’ve always written thank you cards and letters to my grandma, my letter writing fell by the wayside a little. Then, about 10 years ago, I discovered blogging, then instagram and made friends with like-minded people all over the world. The friendships I made online resurrected my love of happy mail and I’ve been sending little parcels and letters ever since.

With loved ones pretty much isolated for the next 12 weeks, now is a good time to take up letter writing and send happy mail. They don’t need to be long, wordy letters. Just a postcard saying I love you, or look after yourself is nice to receive amongst a plethora of bills and junk mail.

I thought I would share some of my favourite sources for inspiration, stationery and hand-lettering. I know it isn’t stitch related but I have a feeling that there might be fellow stitchers who might also be stationery lovers and want some inspiration for sending happy mail!

The Postman’s Knock was the first modern calligrapher I found online. I love Lindsey’s blog, she is super generous with ideas and provides a lot of creative inspiration. I was desperate for her illustrated map course to launch and signed up straight away last week. Lindsey sells lots of beautiful downloads and I highly recommend a few hours browsing her blog posts.

Naomi Bulger has a beautiful blog Naomi Loves; and last year I signed up for her Beautiful Letter course. Full of writing prompts, stationery projects to try at home and beautiful illustrated envelope templates to download and colour, there is lots there to keep you going and inspire you.

Choosing Keeping is by far the best place for pens, paper and other letter writing paraphernalia. The shop is obviously closed at the moment but they are still sending online orders and we small businesses rely on website orders at the moment to keep going. I love their Rivoli writing paper and have it in all three available colours.

You’ve heard me sing the praises of Abby Monroe before. Ever since her journal workshop at the studio last year I have been obsessed with rubber stamps, zines and other mini books. I am hoping that I can book Abby in for more workshops at the new studio space as soon as the Covid restrictions are lifted. Fingers crossed for Autumn! Check out Abby’s website and follow her instagram page- she has lots of online workshops planned this Spring and they are worth dialling in for.

I’ve grown out of sending song lyrics in the post but I do like to add one or two little pretty things to my envelopes if I can. Pressed flowers, vintage floral cigarette cards, scraps of fabric and tiny doodles all make their way into letters from me at some stage. Kate Nicole’s beautiful cards, paper garlands and labels are perfect additions to letters; you can usually find Kate at various brocantes around the country but for now Rosehip in the Country is their online shop.

If you have any suggestions of other stationery suppliers or letter-writing bloggers please let me know in the comments below!

With love

Nicki xx
Free Tutorial: Antique Quilt Needle Case


P3232487.jpg

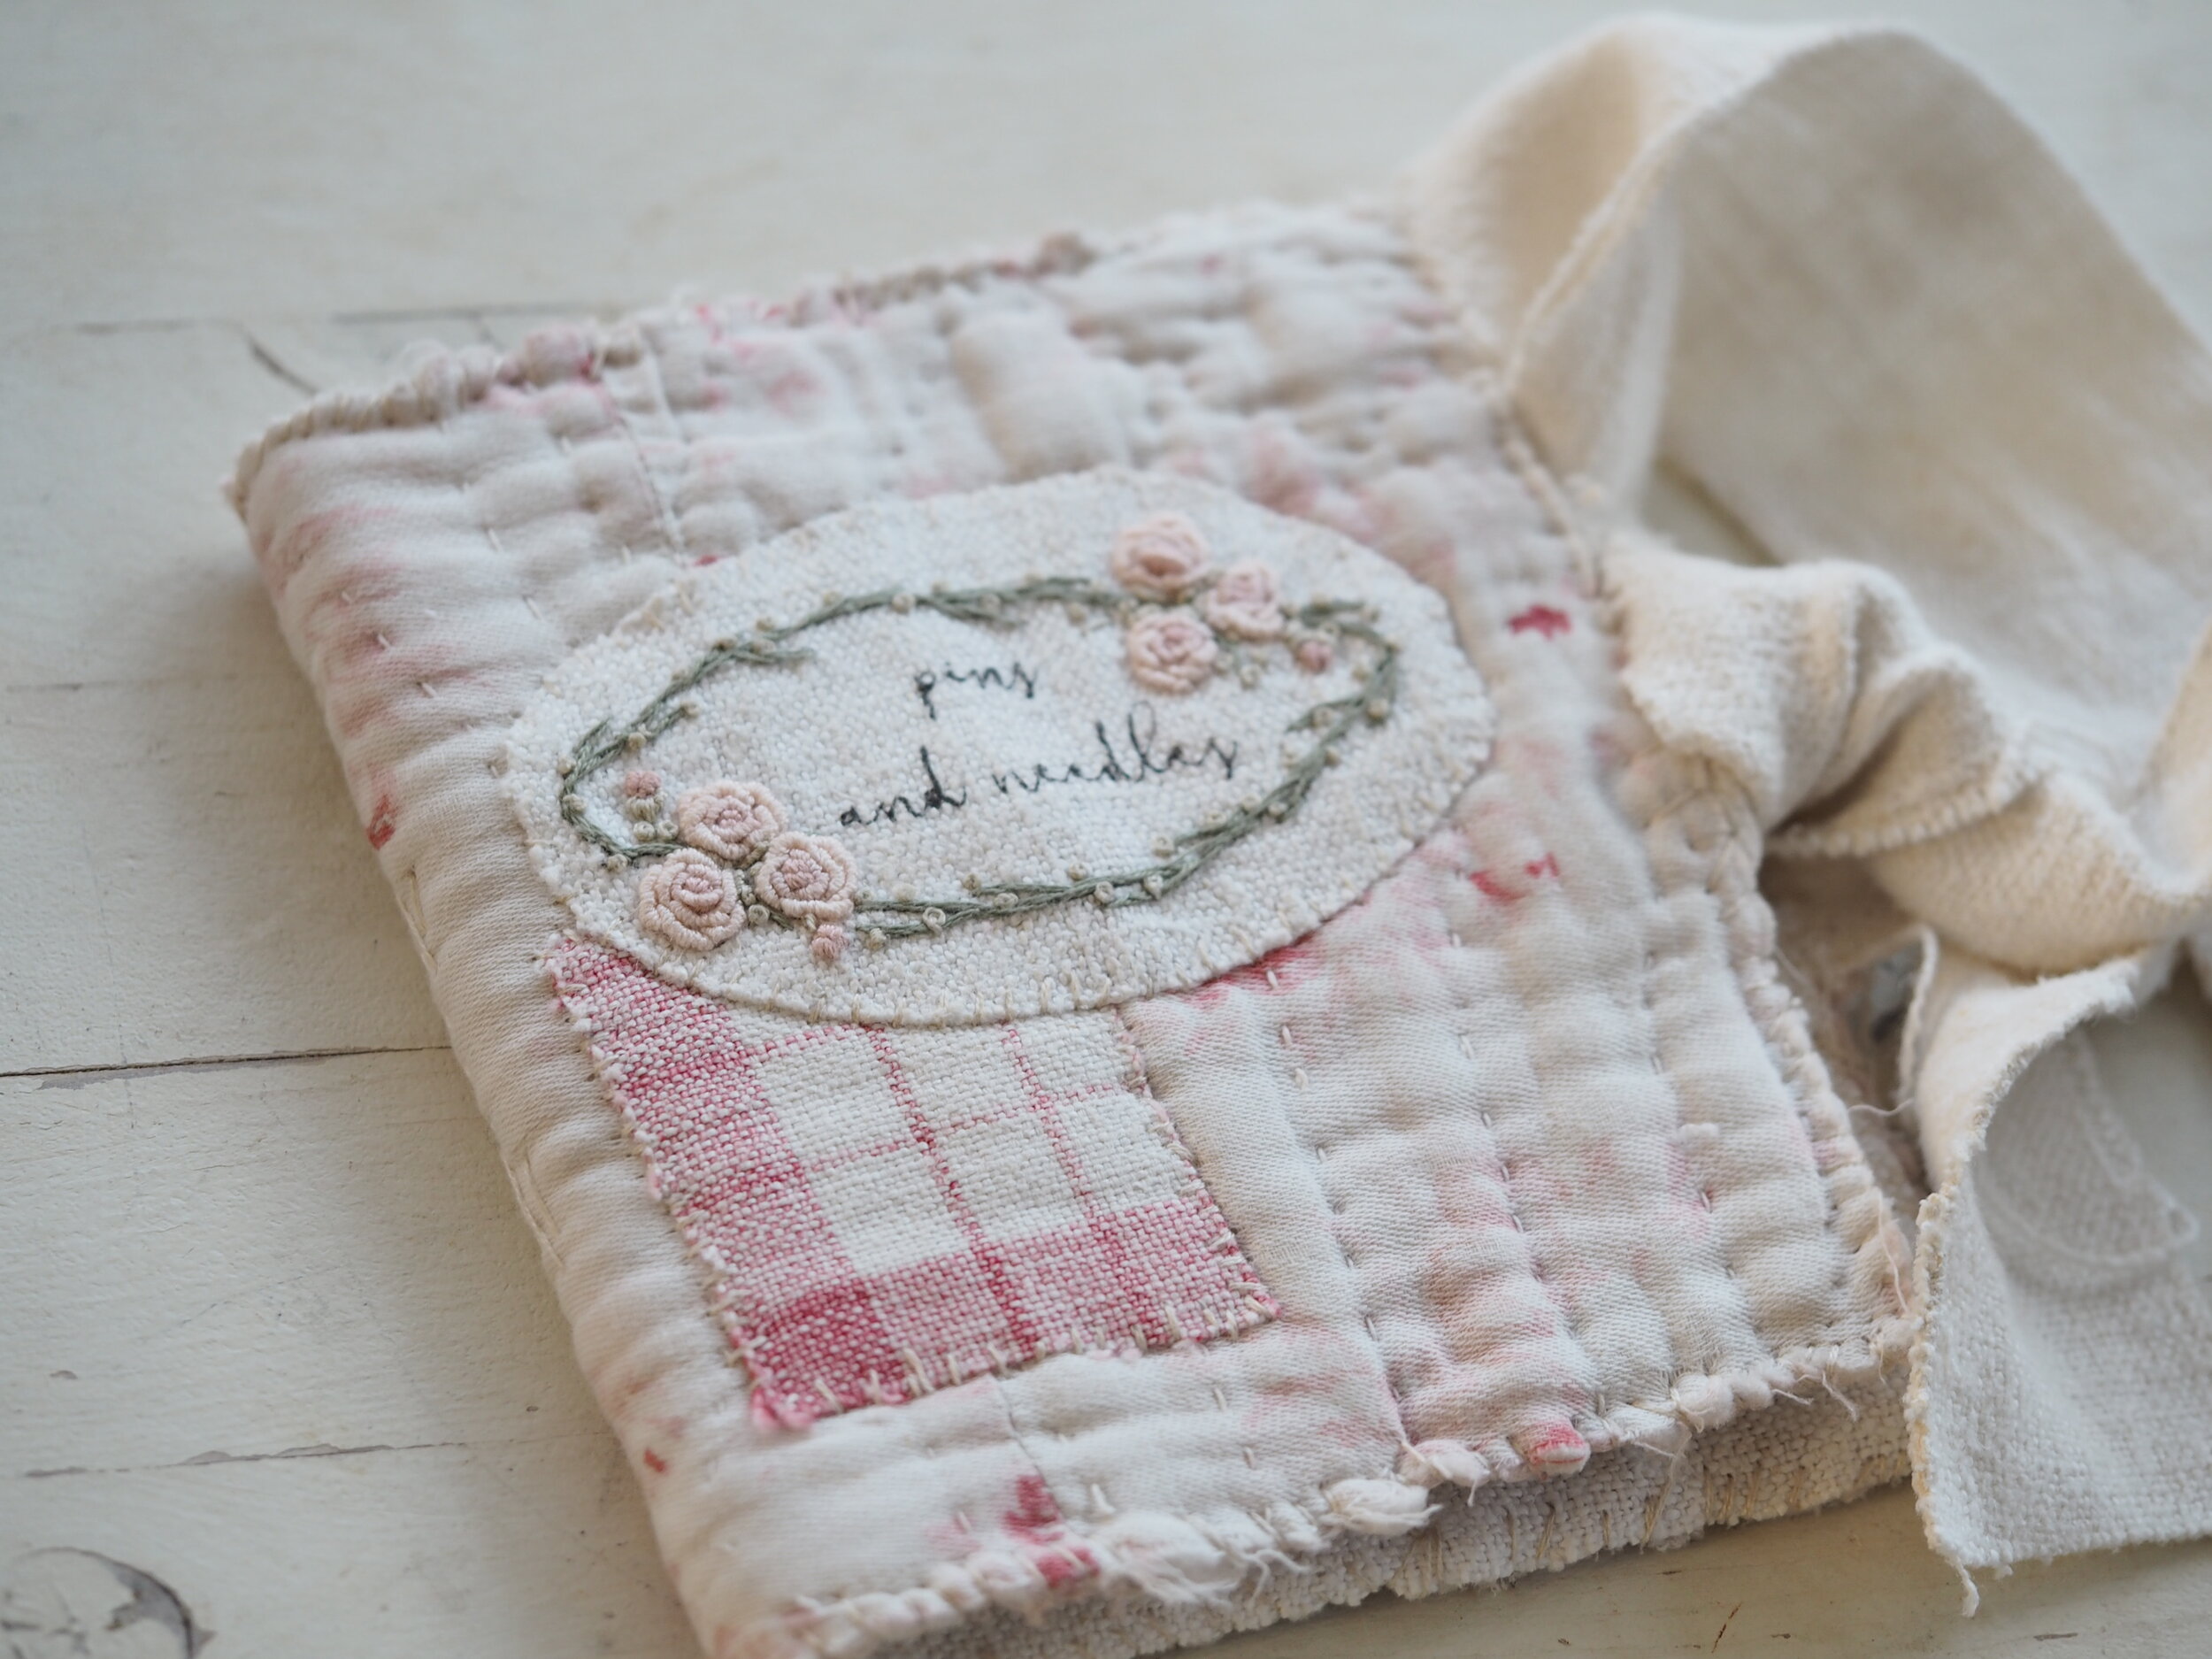
Regular followers will know that I love a needle case! I make them a lot for myself, and friends, and often buy them from fellow makers. A handmade needle case makes a lovely gift for a stitching friend; you can make them as simple or intricate as you like; as small or as large as you fancy.

This is a tutorial for a very simple hand sewn needle case. I designed it for a workshop at The Dorset Brocante and provided the little printed patch for stitchers to embroider and attach to the front of the book. The patch is available here if you’d rather buy one but you can make your own patch quite easily if you like. I’ve added the pdf pattern below if you’d like to trace it - I printed the pattern and text on to mine and left the text as is, without embroidery. It is permanent ink so won’t disappear. For the text you could use small rubber stamps or handwrite if you have neat writing (I don’t).

Below is the list of items you will need. Gather your supplies, grab a cuppa and let’s get started.

Pins and Needles you will need.jpg

Complete the embroidery

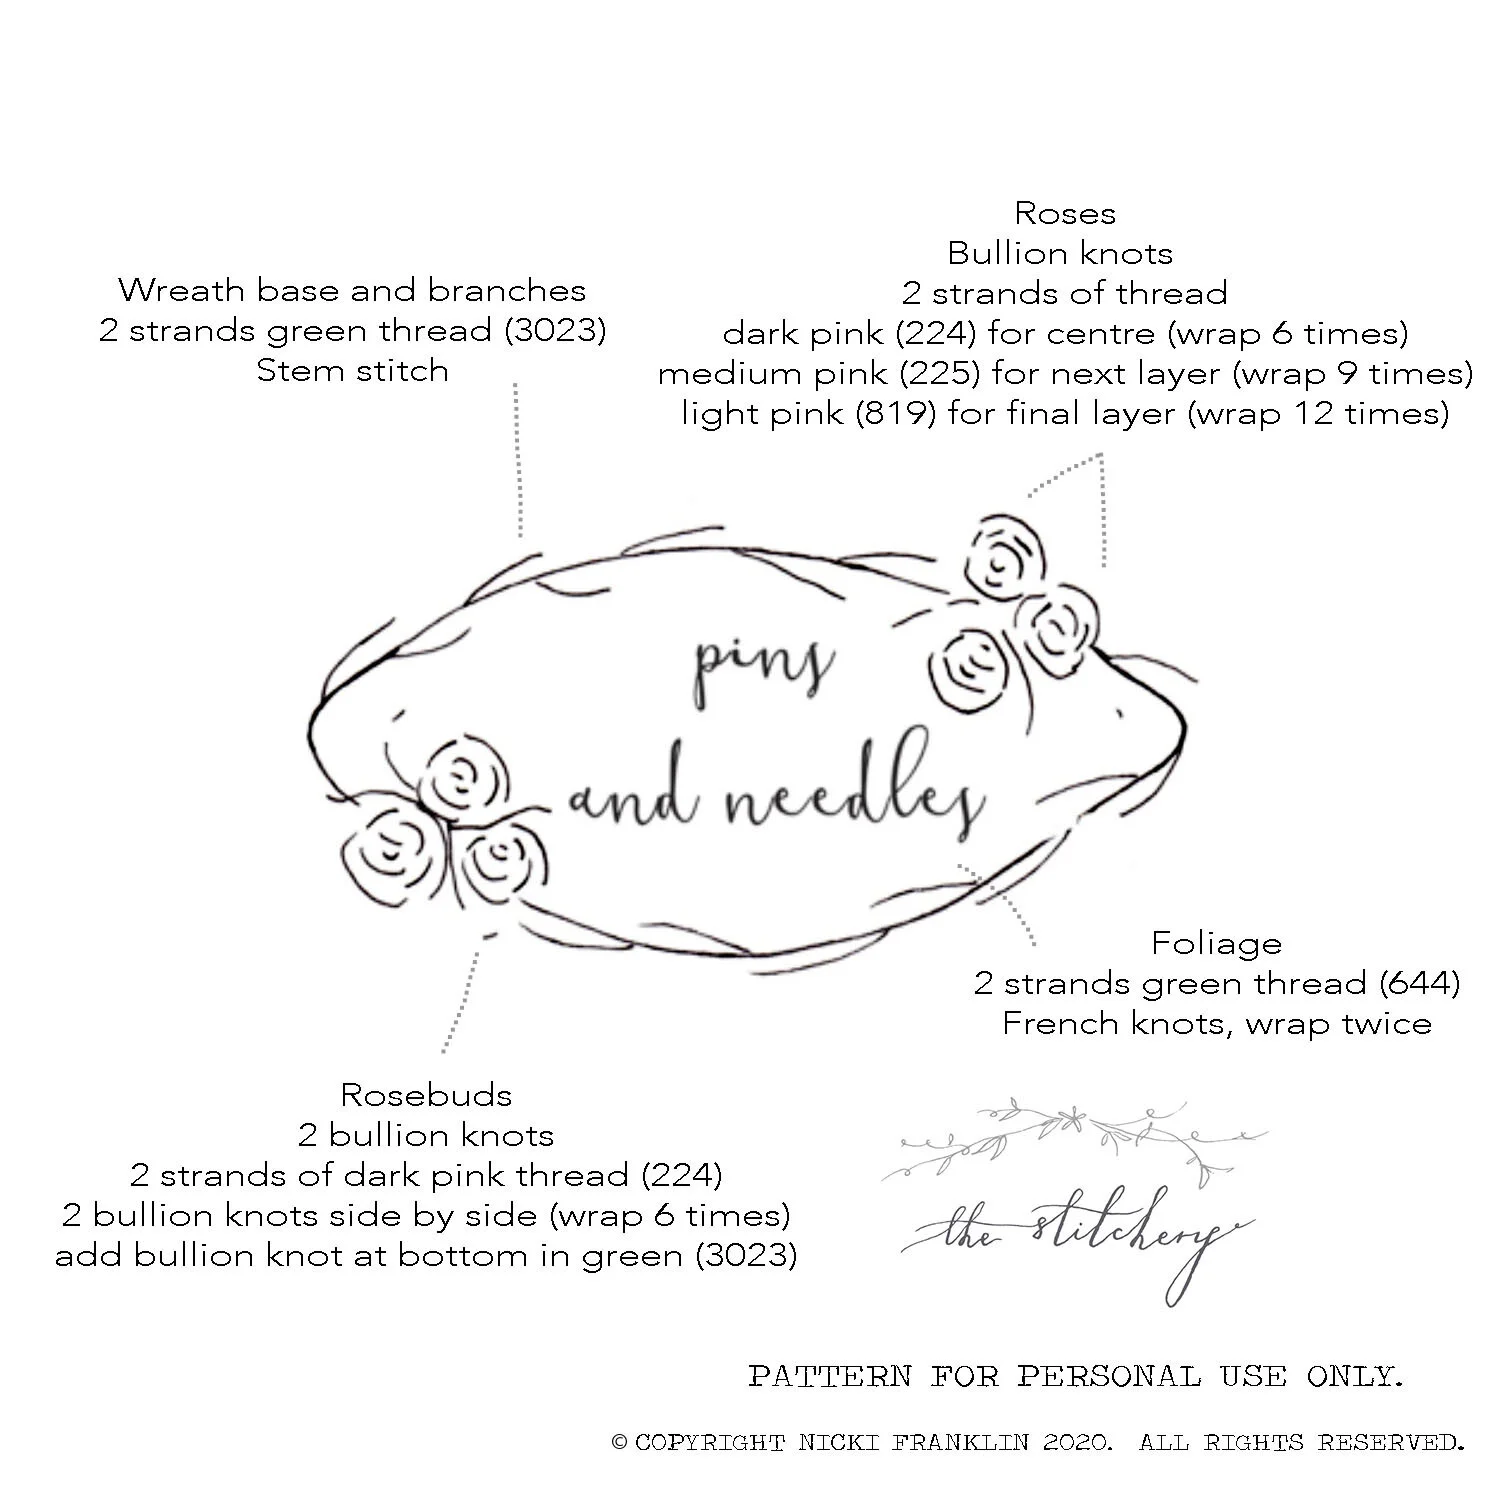
Download the pattern here and transfer using your preferred method and fit a hoop to your fabric. A 4” hoop is perfect.

Begin with the wreath base and branches. Using two strands of darker green (I used DMC 3023) work a split stitch to cover the base and all branches. Add little French knots for foliage randomly around the base. I used two strands of light green thread (DMC 644) and wrapped twice around the needle.

To stitch the roses, first make two bullion knots close together for the centre of the flower (the rosebud). Use two strands of the darker pink (DMC 224) and wrap around the needle six times. Make sure they are close together with one slightly higher than the other.

Make three bullion knots around the rosebud. Use two strands of medium pink (225) and wrap around the needle approx 9 times. Make sure you curve the knot around the rosebud as you lay down the stitch. Take care also to overlap the petals for a more realistic effect.

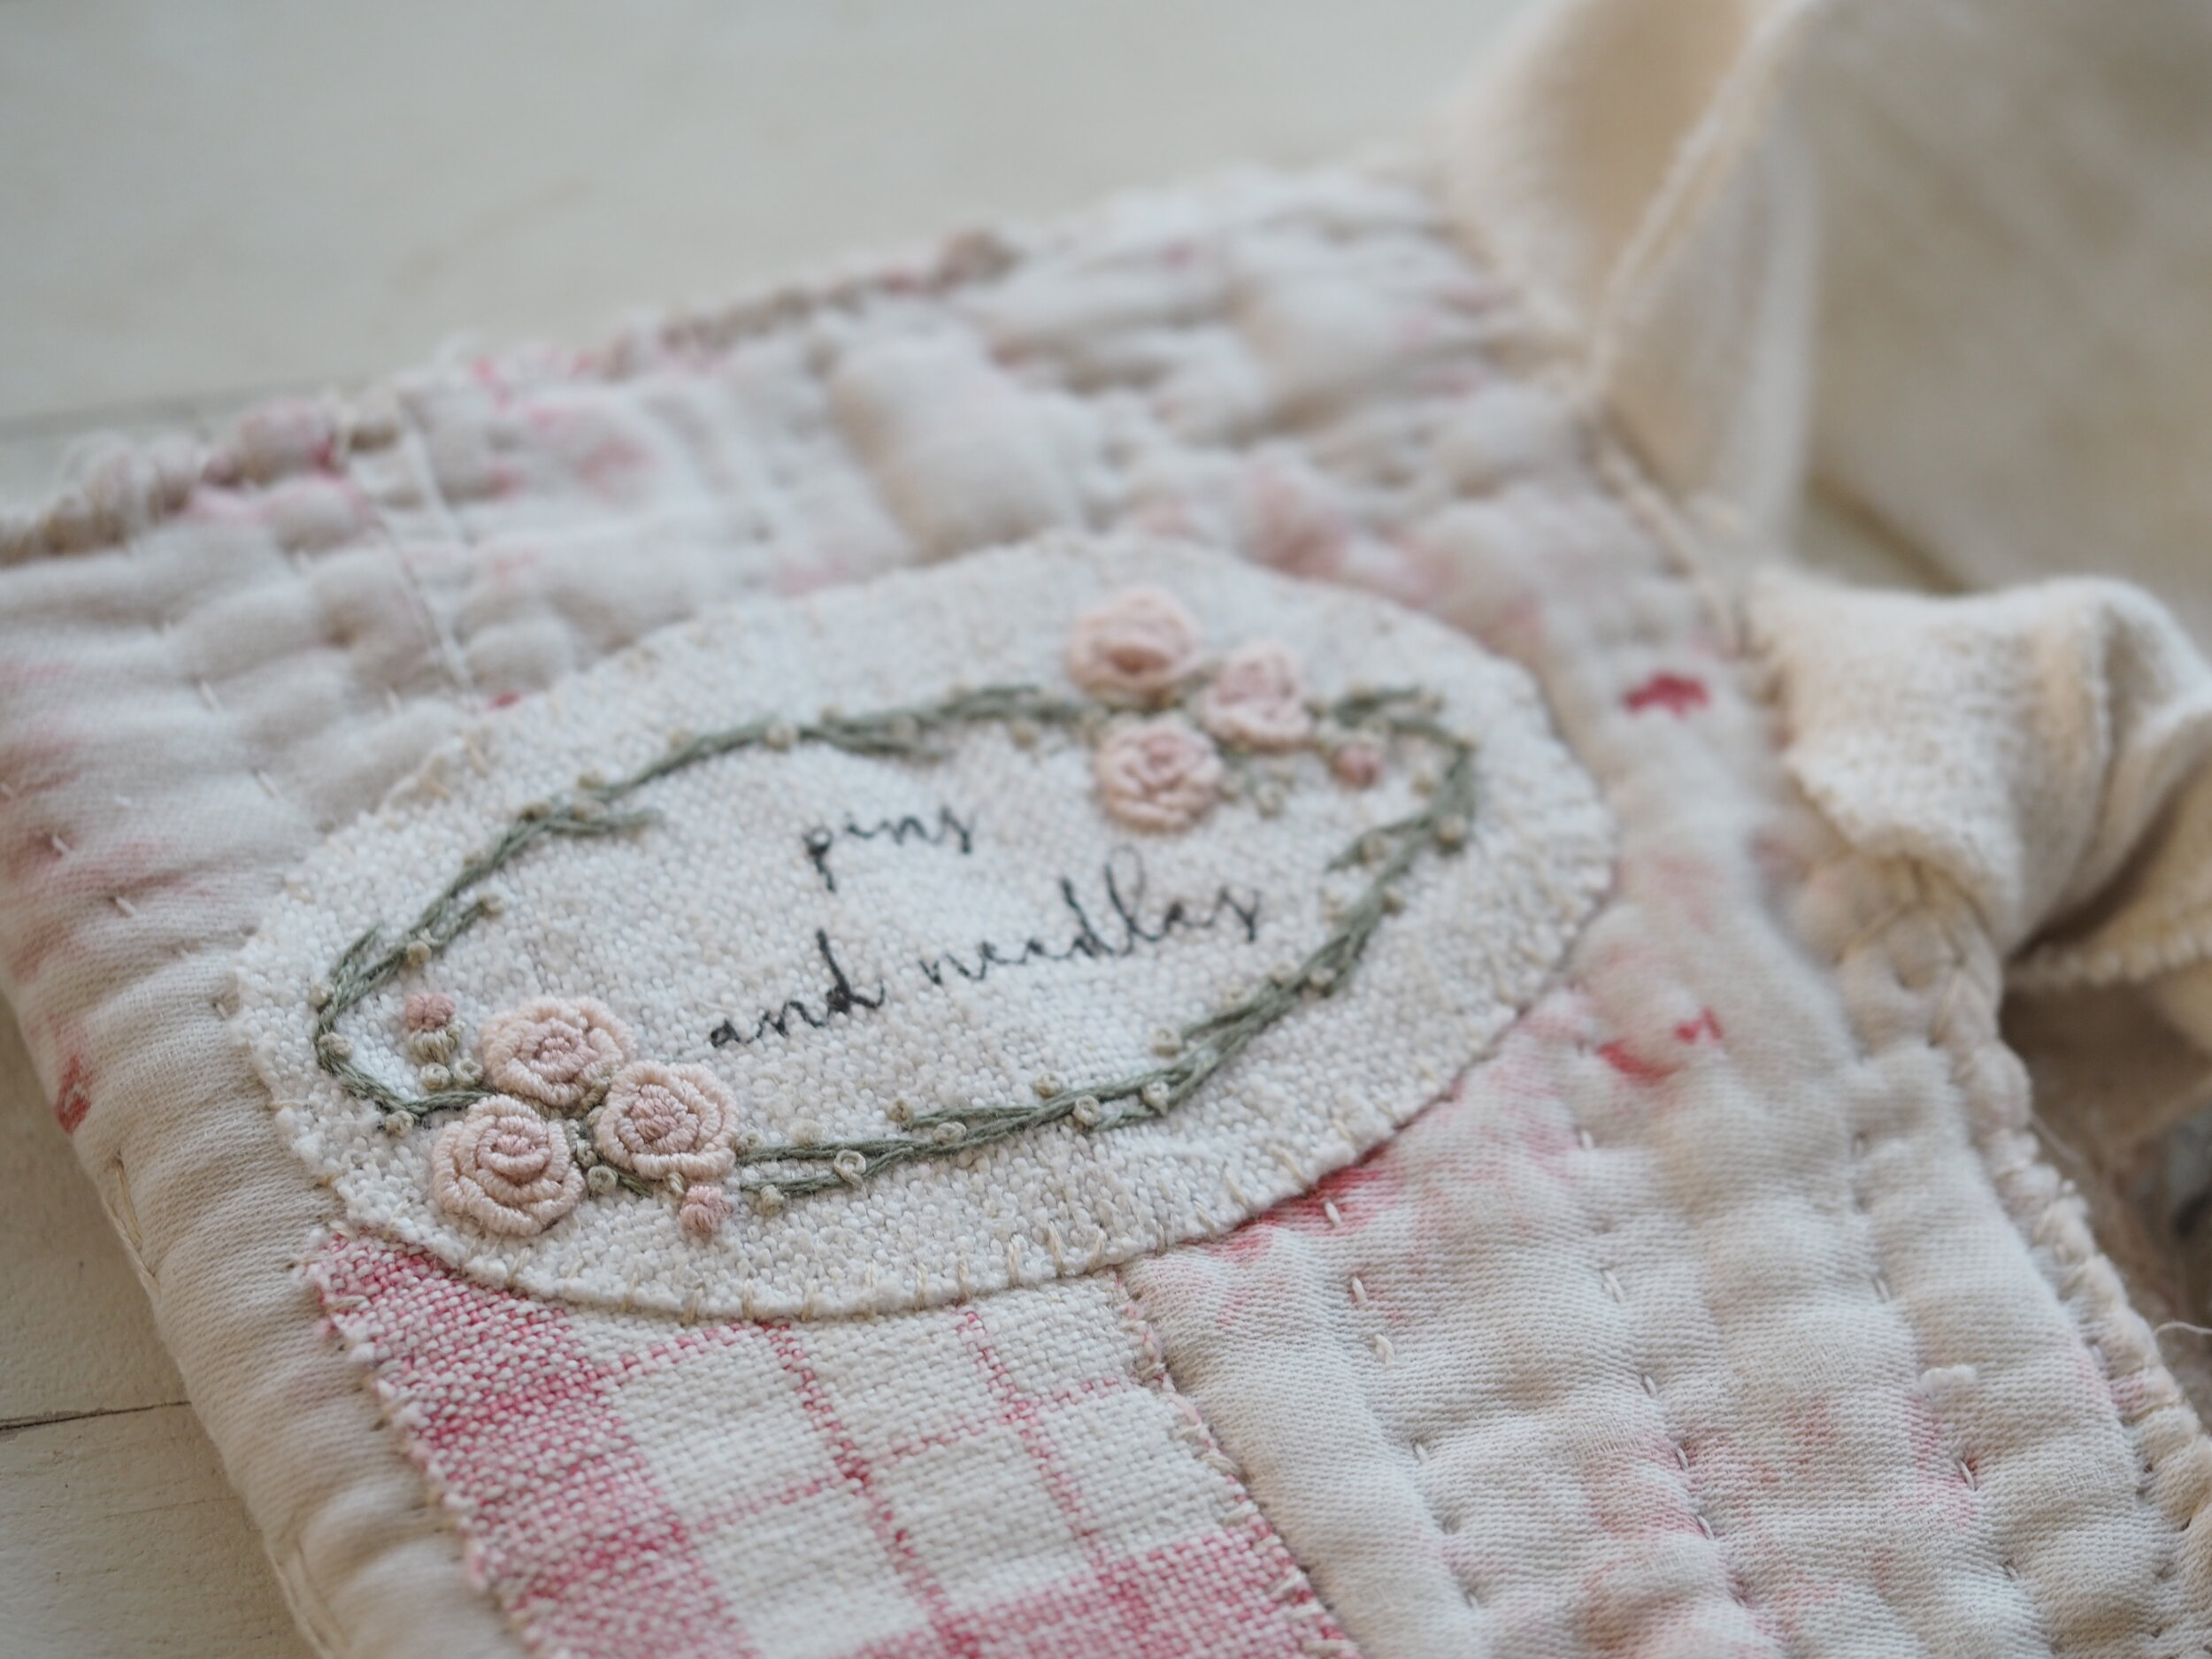
Finish the outer layer of the rose petals with the lightest pink (DMC 819). Again using two strands of thread, make bullion knots overlapping and curving around the flower, you will need to make five or six bullion knots to cover around the edges. Wrap around the needle 12-14 times. Add French knots in the light green (DMC 644) in and around the roses.

Make rosebuds where indicated on the photograph. Do this as per the first round of stitches for the whole flower but make a bullion knot in green (DMC 3023) to curve around the bottom of the petals to suggest a calyx.

If you don’t like bullion knots, you can make the roses with spiralling stem stitch or a woven wheel.

Press your work on a fluffy towel and it is done!

P3232485.jpg
annotated pattern.jpg

P3232484.jpg

Make up the case:

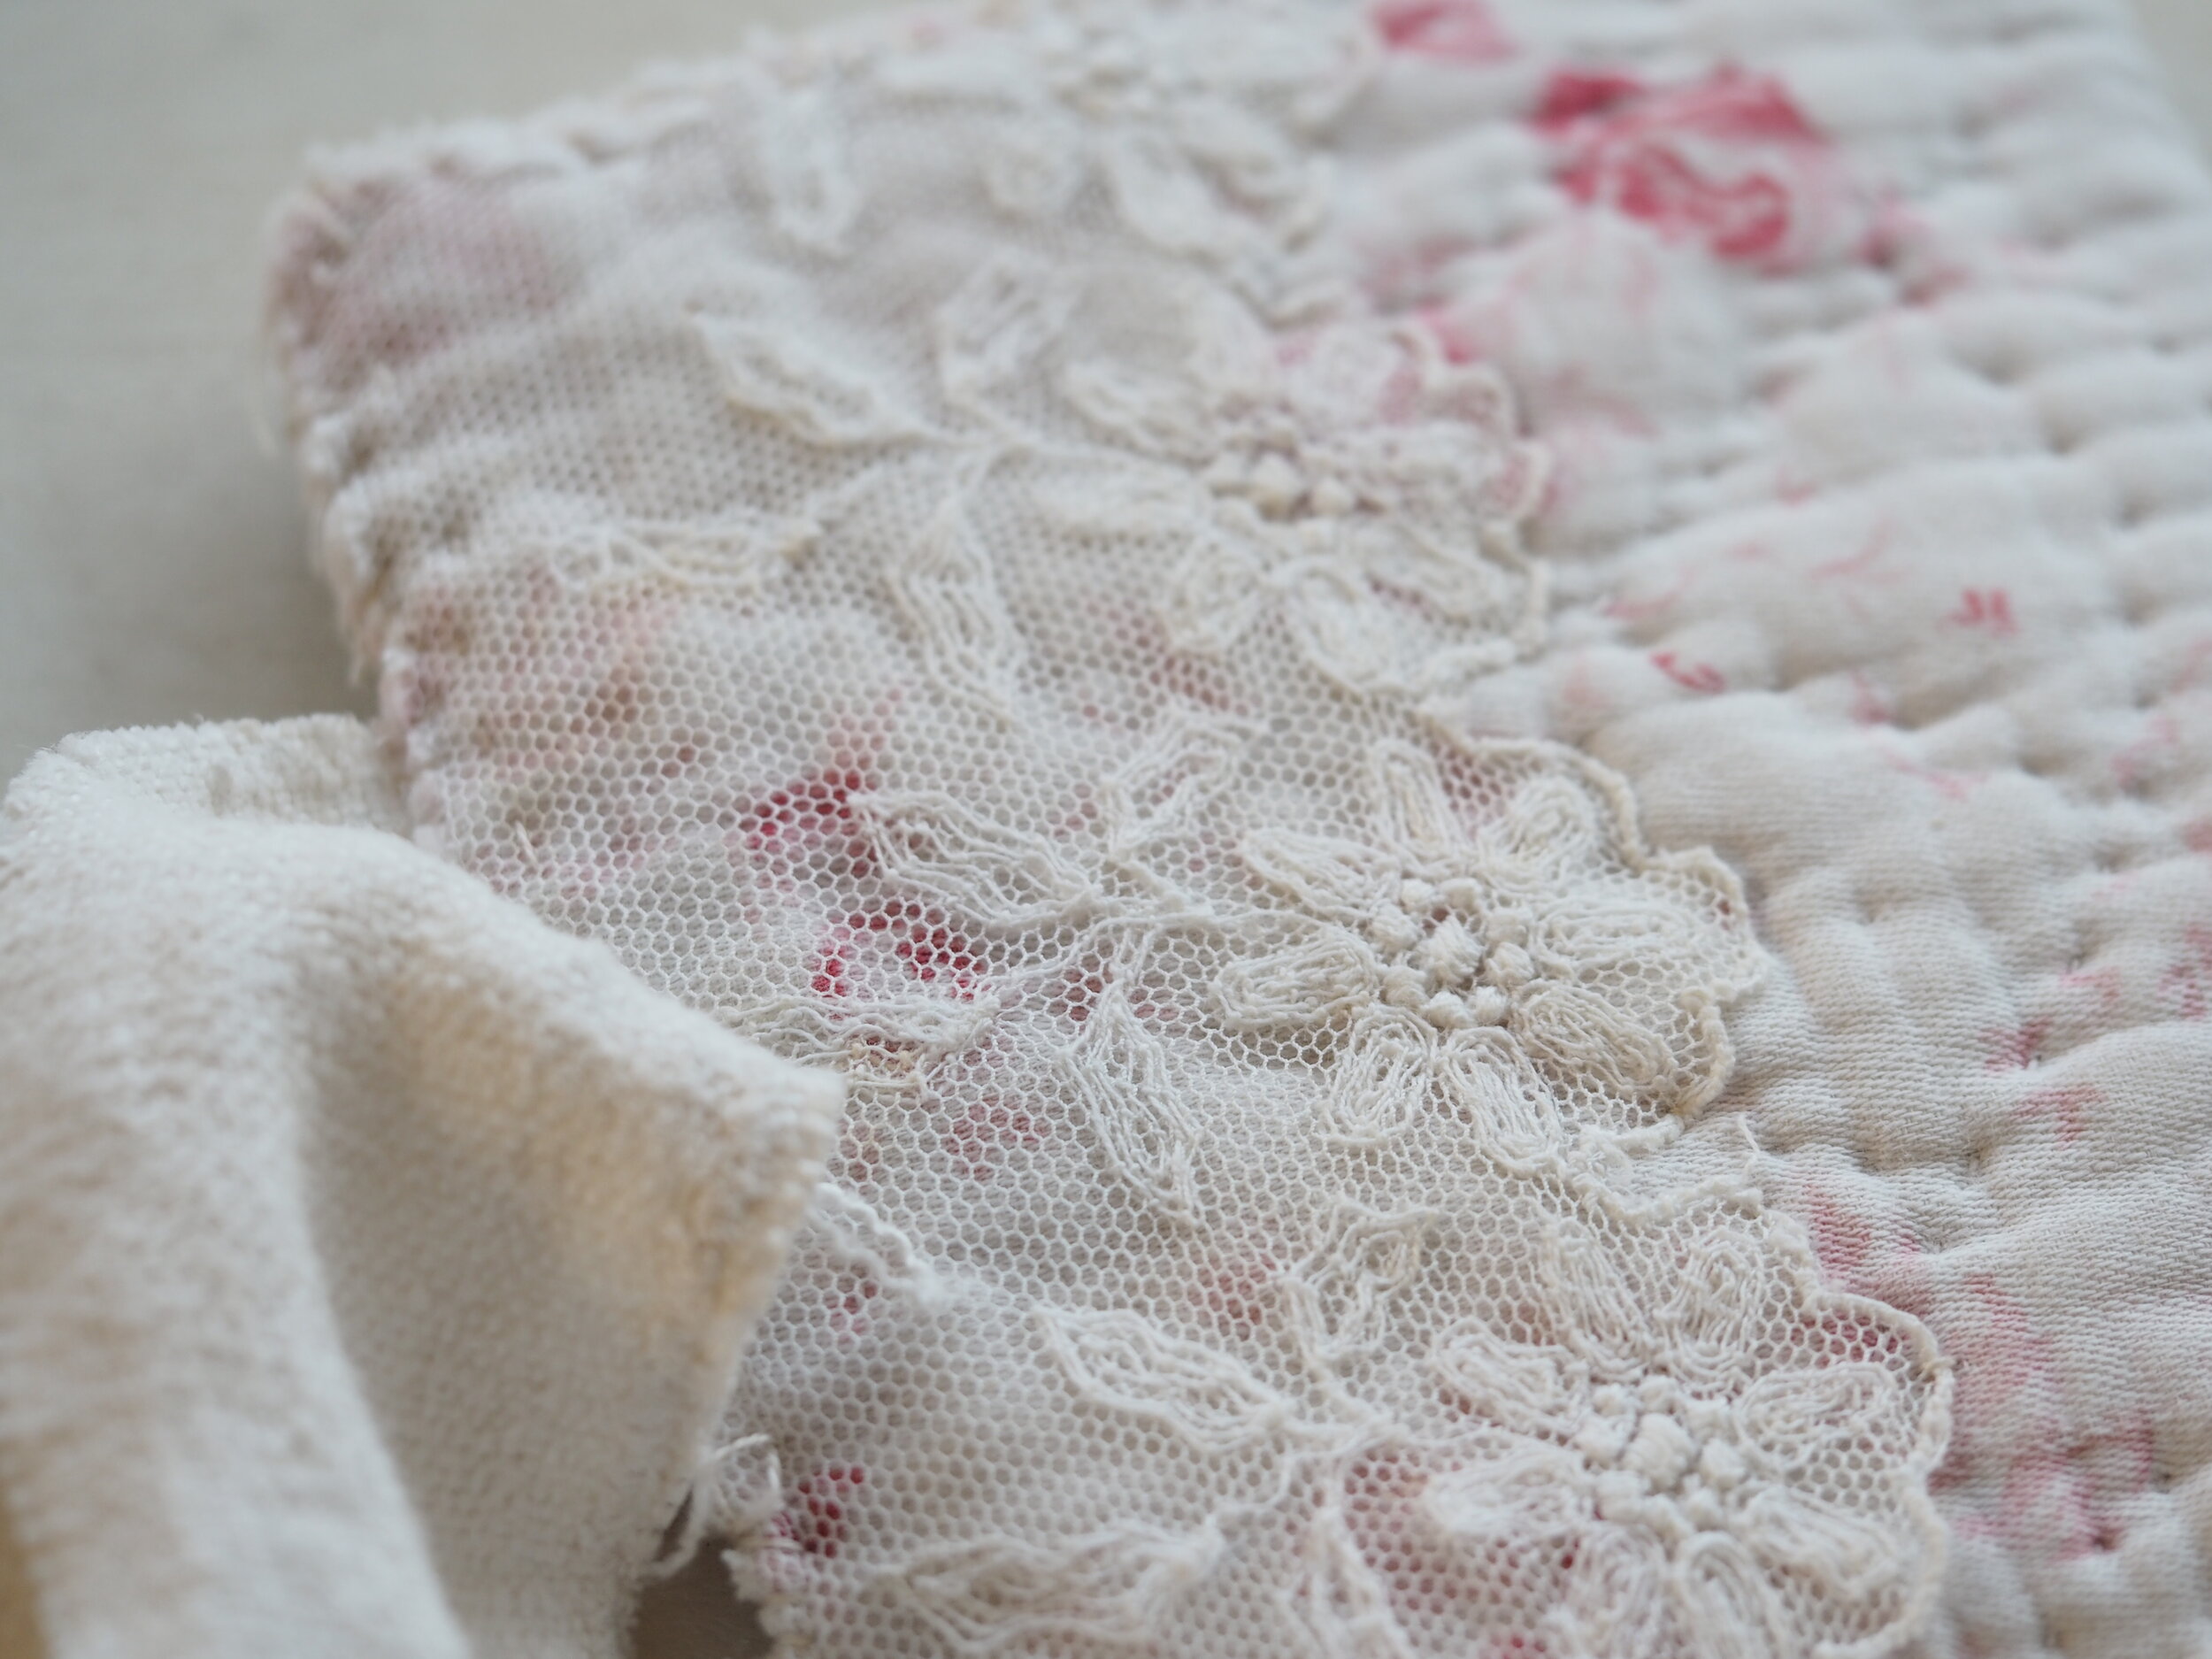
Stitch the lace to the back of the needle case using tiny stitches across the edge just to catch it down.  Use one strand of your ecru thread for this or a neutral general sewing thread.

P3232493.jpg

Cut a small patch or two of contrasting fabric and apply fusible web to the back with a hot dry iron. I used a piece of old checked fabric. Apply fusible web to the back of the fabric patch with a hot dry iron.  If you haven’t used fusible web before: The paper side of the web should be on the outside and the cobwebby fusible side of the web should be facing the back of the fabric.  Press with an iron for a few seconds and let cool.  Remove the paper from the back of the fabric (score down the centre with a pin to make it easier to remove).  The back of the fabric will now seem slightly rubbery – this is the adhesive and means it is ready to be fused to the needle case.  Put the fabric in place on the quilt piece, right side up and press with an iron for a few seconds.  The checked fabric should now be attached to the quilt.  Stitch around the edge of the fabric patch with a basic rough whip stitch using strands of ecru thread. Add other small patches to your quilt in the same way if you like.

Now fuse the embroidery to the bondaweb in the same way and cut an oval shape around it.   Attach to the front of the needle case and stitch around the perimeter, again with a basic whip stitch. These whip stitches are just decorative as the bondaweb will hold the patches in place permanently.

rough stitches catch the linen ties in.

rough stitches catch the linen ties in.

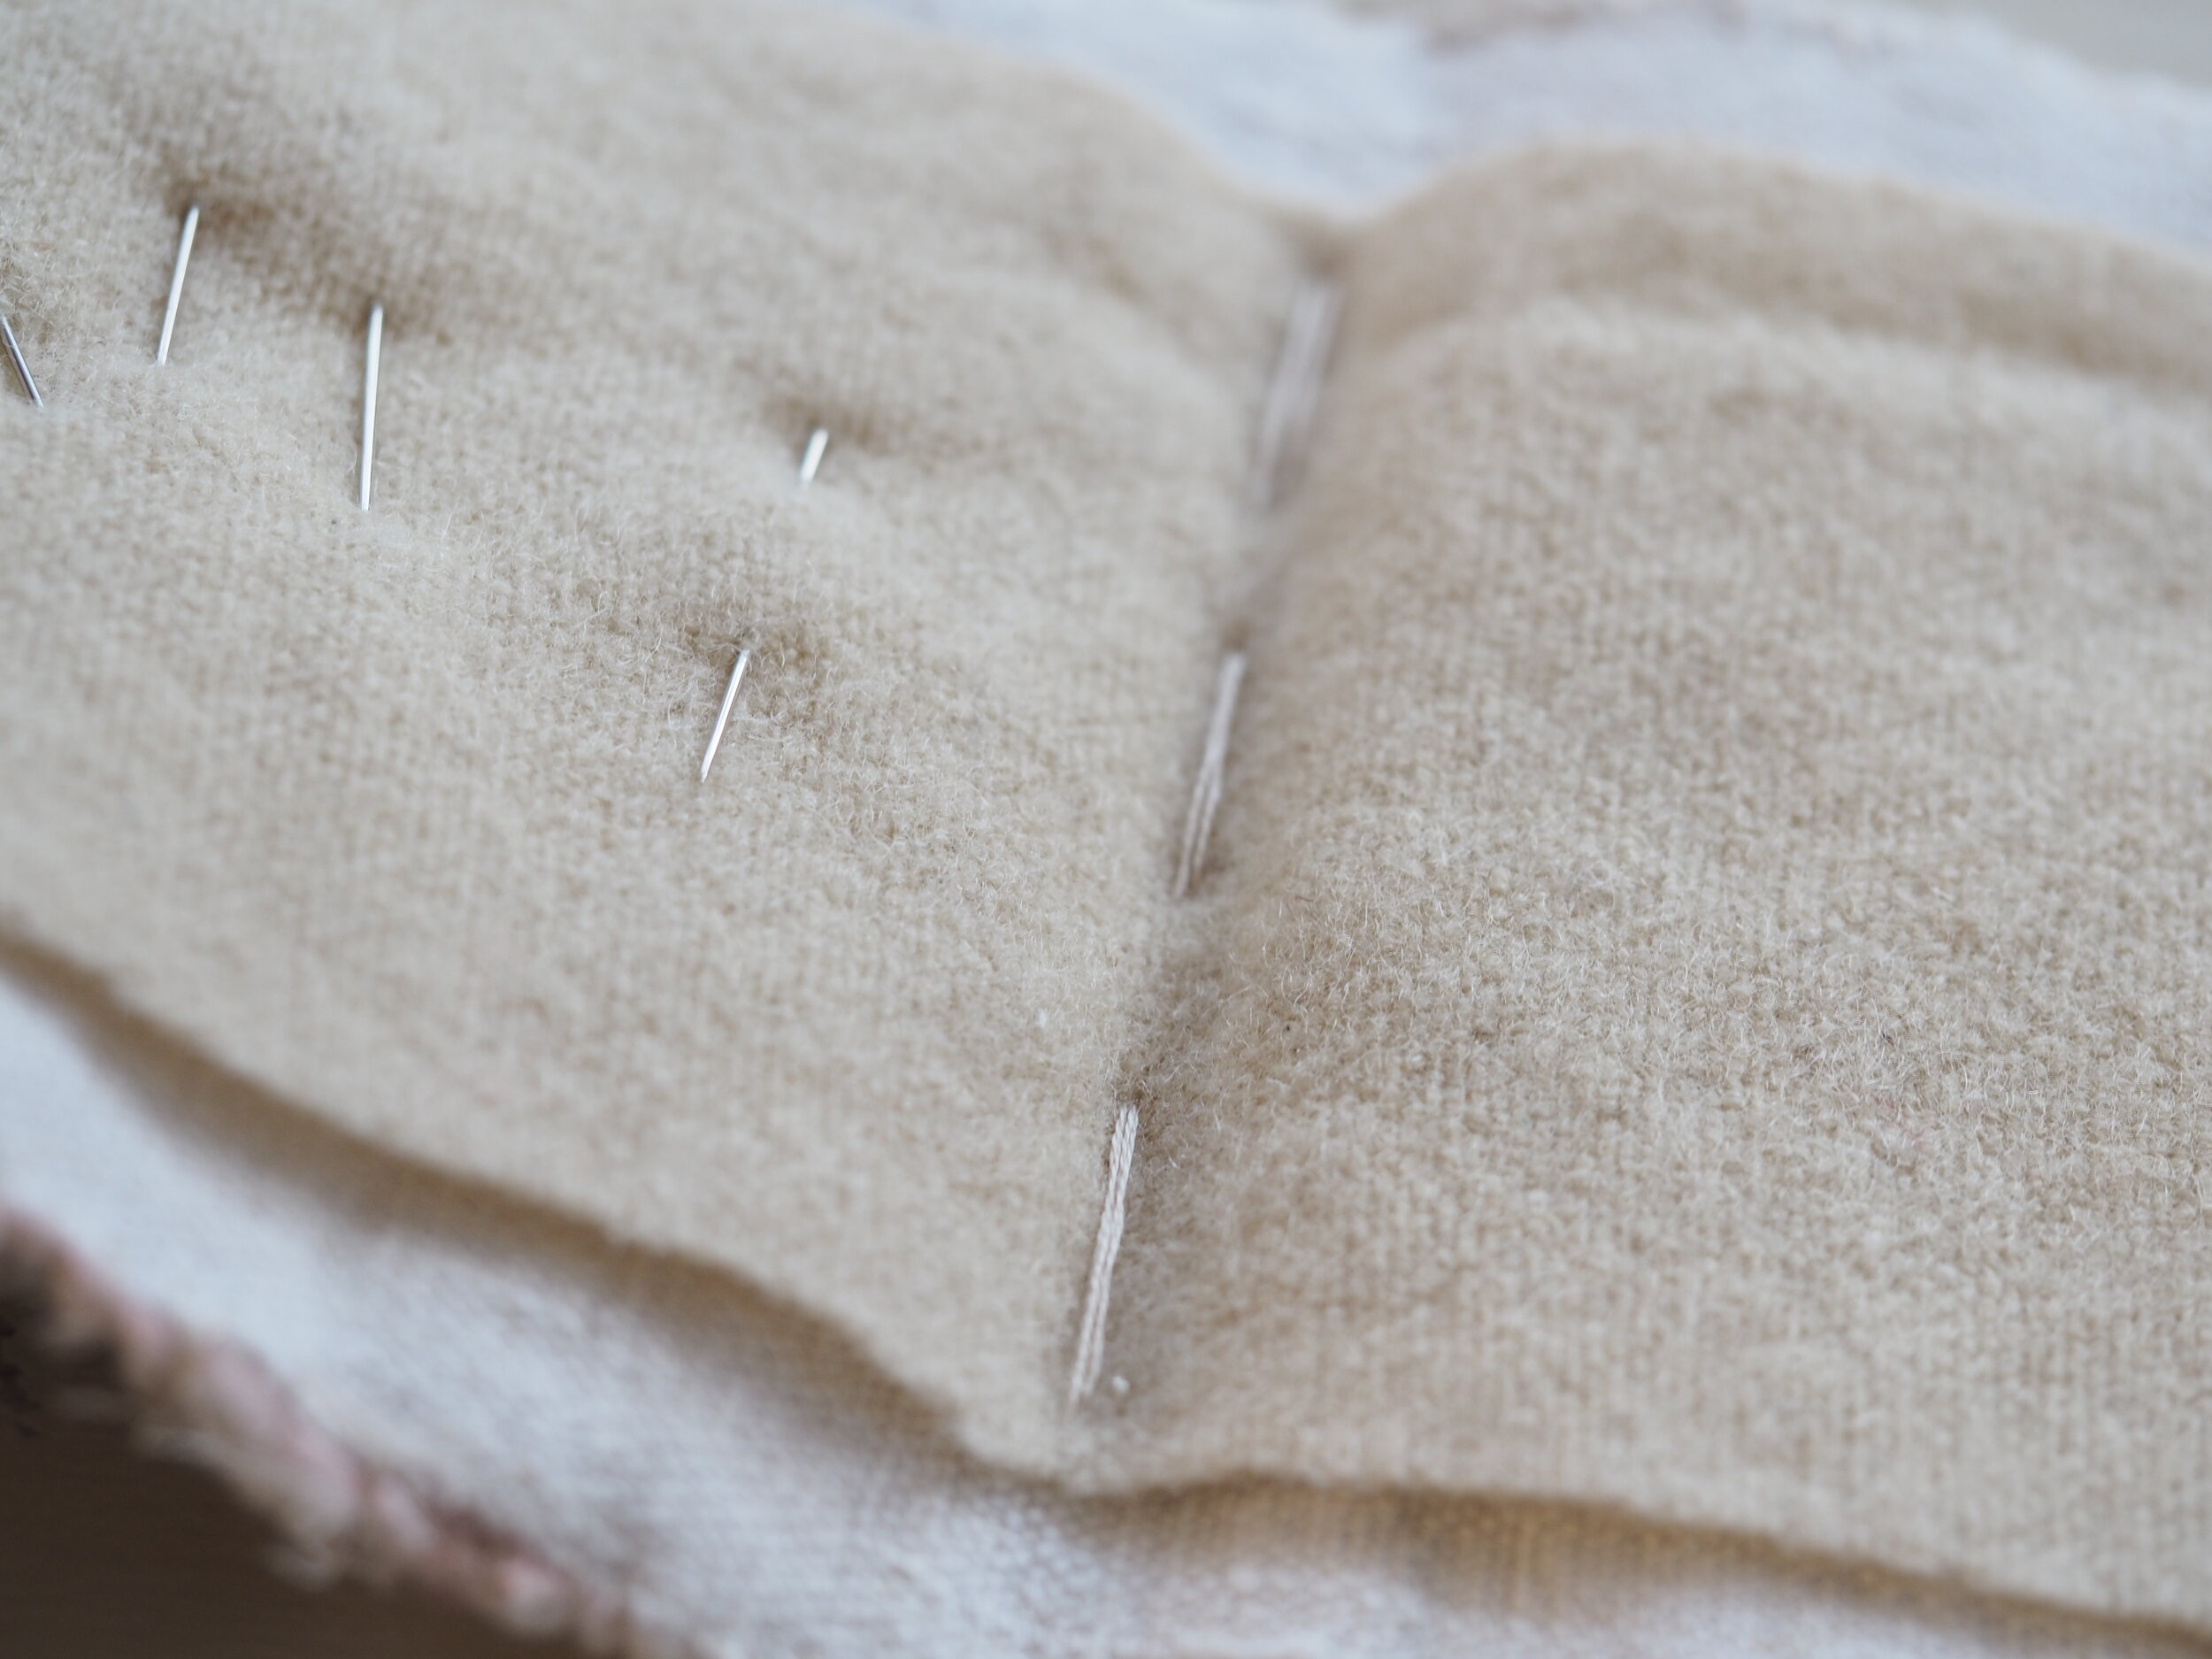
Catch the linen ties in place on the inside of the needle case using a couple of stitches trying not to come through at the front of the quilt (these stitches can be removed at the end if they do show so don’t worry too much.)

Attach the plain linen to the inside of the needle case using bondaweb  and work a rough stitch around the edge, being sure to catch the edge through the linen ties.

P3232490.jpg


P3232491.jpg

Attach the piece of wool to the centre of the case with with a basic long running stitch.  Fold and press the case – you are done!

Pattern notes:

If you don’t have fusible web you can attach the patches and linen using only the stitches but be sure that your whip stitch is strong and secure. You could also hand quilt the inner linen to the quilt piece to further secure it.

Add an extra square of felt to the front and back of the needle case for additional room. You could also make a simple pocket for your scissors by attaching another piece of fabric on the inside. The idea of this needle case is that it is rough yet tactile, with the shabbiness of the quilt and the torn linen contrasting with the delicacy of your embroidery.

You could of course add two pages of wool felt to the centre of the needle book. Patches, darning and embroidery inside the case would be pretty too.


If you’d like to have a go at making your own embroidery pattern, draw a rough oval and position flowers where you like (you could just substitute the roses for daisies or make a wreath of hyacinths around the edge). I used an old pink quilt piece and the pink roses fit beautifully but white roses are a good option too. Choose a darker beige for the centre (maybe DMC 3033) with an off-white for the next layer of petals (maybe DMC 3866) and then the final layer with a brighter white (DMC 3865). I rarely use DMC Blanc; it is almost glaringly white; 3865 is much softer.

I would love to see your version on social media; I especially love progress photos with cups of tea and scraps of fabric laying around. Please share via #thestitcherystudio hashtag on instagram if you can. It is nice to feel connected, particularly now.

Happy stitching (and if you notice a typo or something isn’t clear please drop me a message below and I’ll fix it.) .

With love,

Nicki x

PIN ME to remember for later…

Pinterest pin needlecase.png


New in the Shop - Hand-turned vintage-style point turners

P3232482.jpg

Handmade especially for The Stitchery by Rose and Wren, these 3” vintage-style point turners are perfect for poking out the corners of cushions and needle cases but they are also ideal for bagging out tiny limbs of rag dolls. Made extra dinky, you can pop one of these in your travel sewing kit. I am delighted with them, they are made of a very pretty blonde oak wood; smooth and tactile. A good pointed tip but not lethal. You can buy them here.

I’ve also added a few 5g balls of pretty Anchor perle cotton and updated our scissor stock. More to come soon but the post is a little delayed with the current health emergency.

I hope you are keeping well and that stitching is keeping you calm.

With love

Nicki x

Free Embroidery Pattern: A little Spring cheer

SPRINGPOT2.jpg

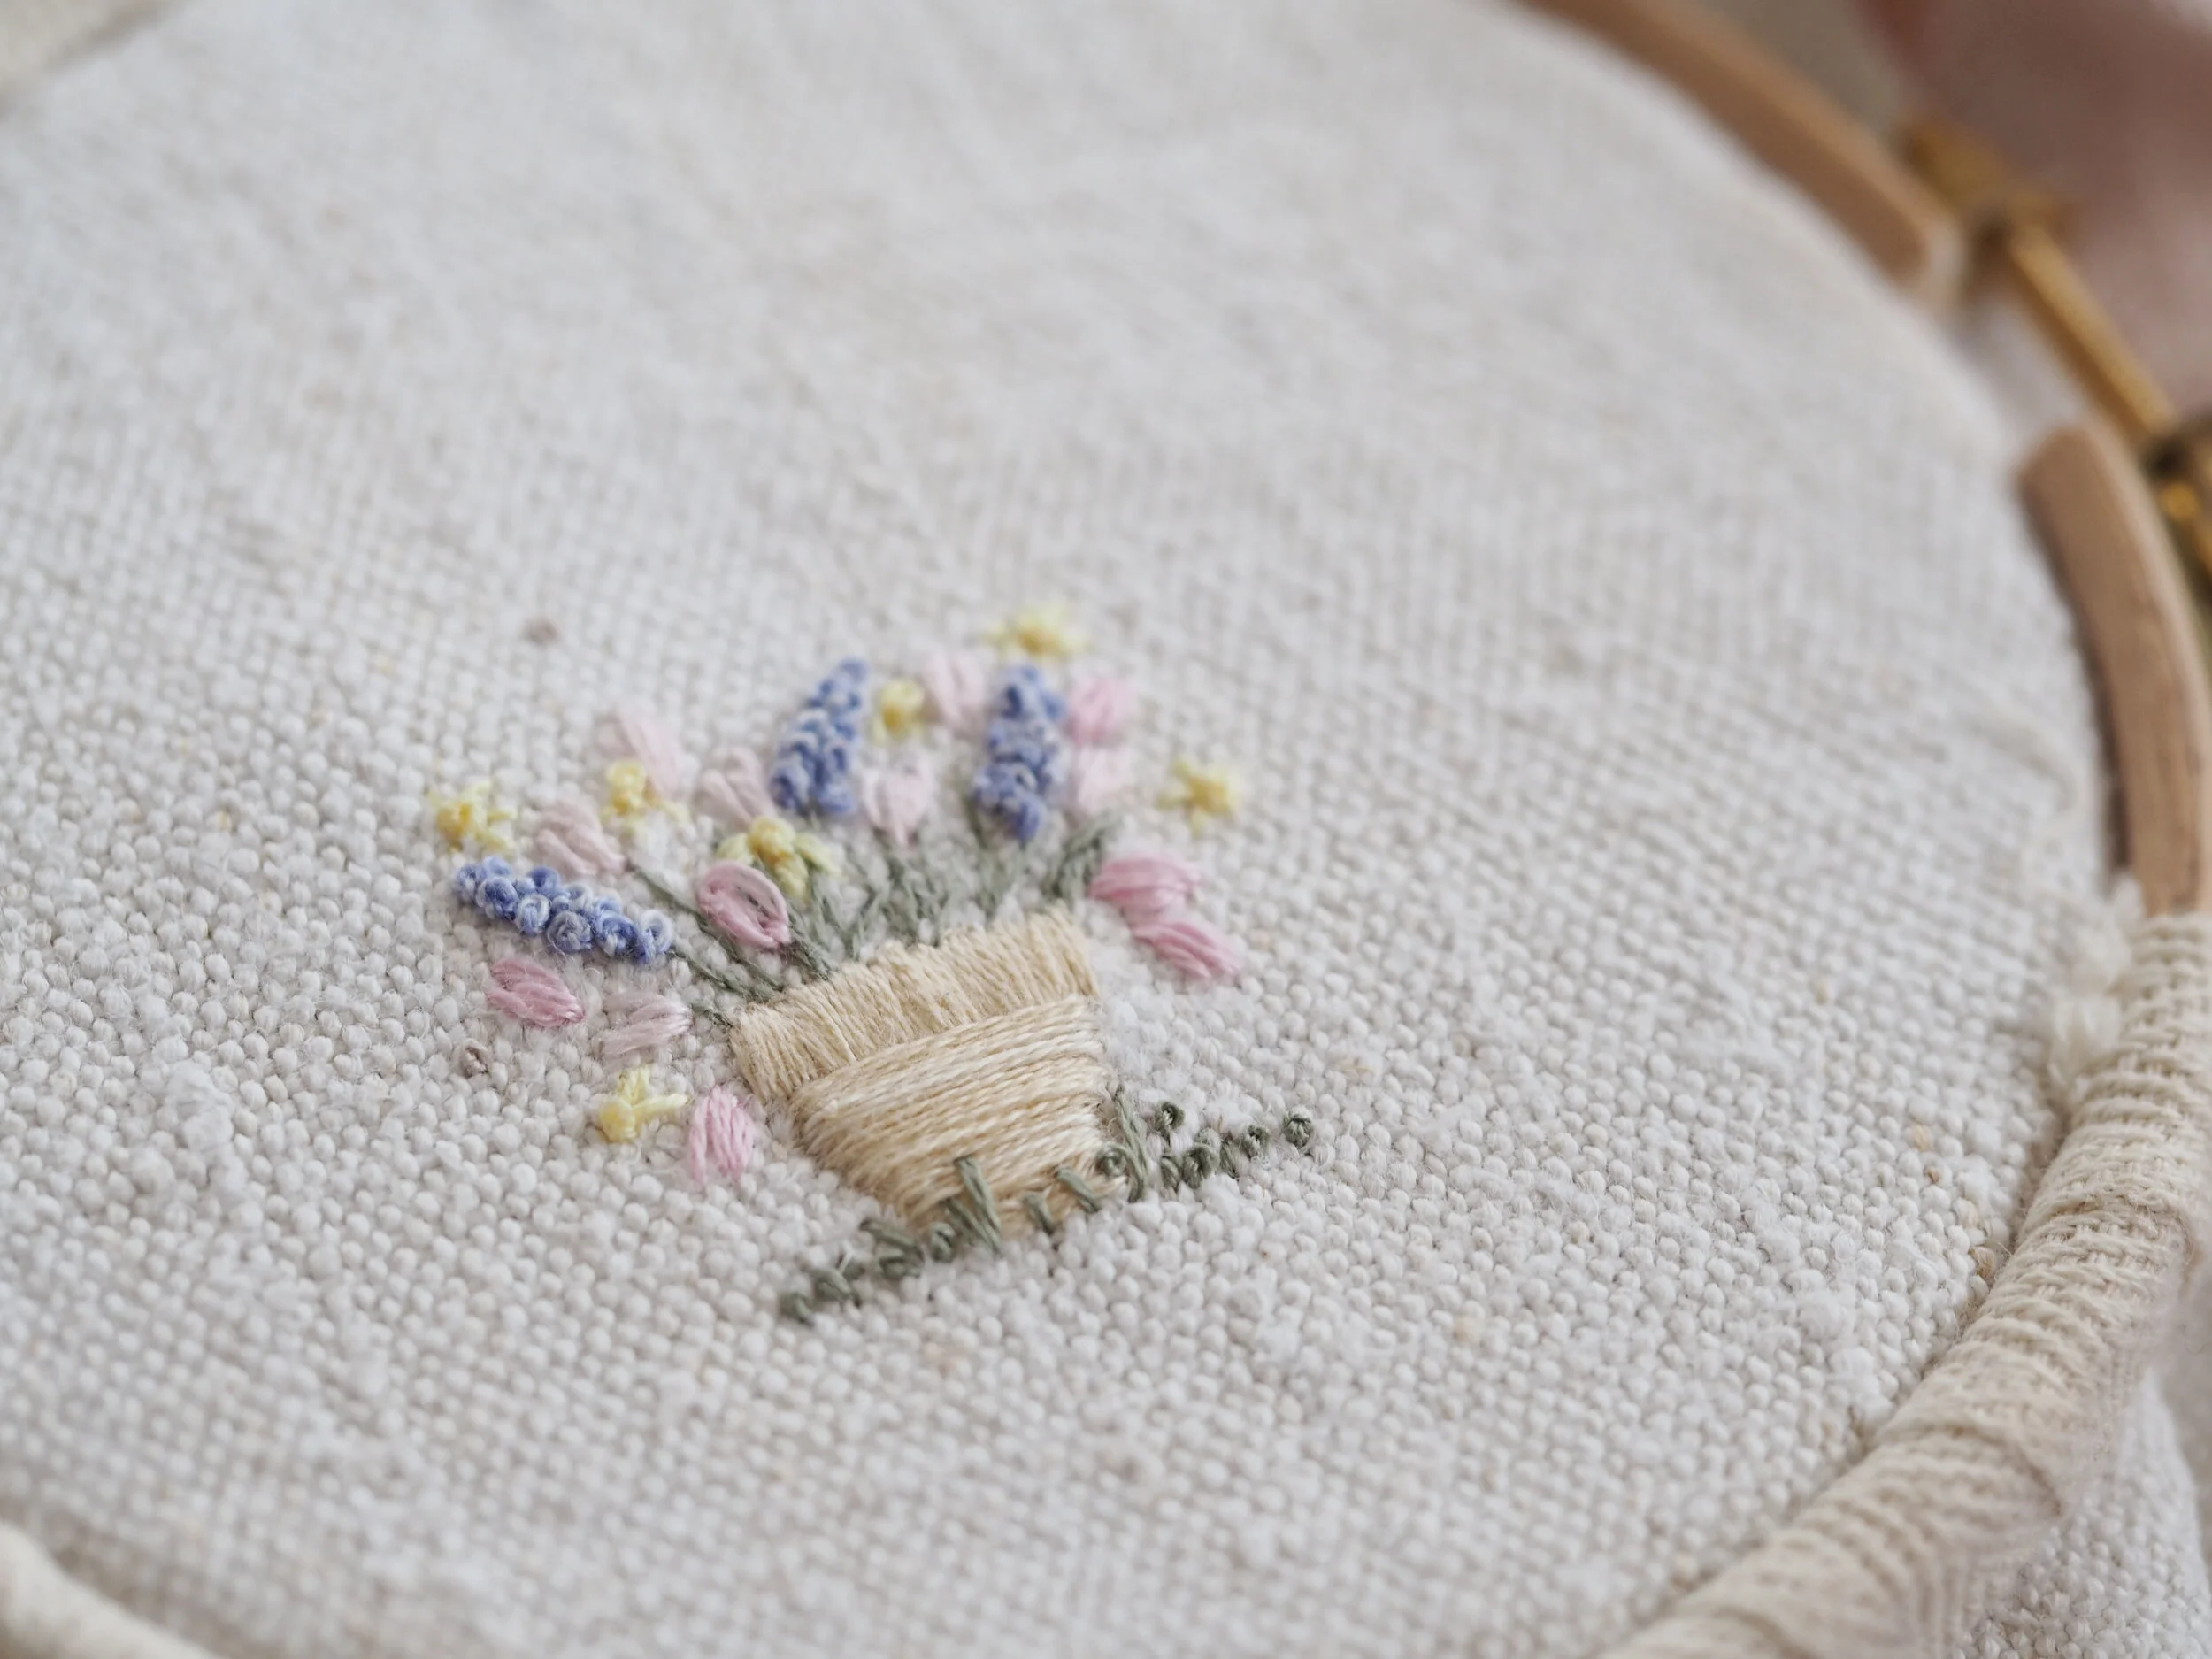
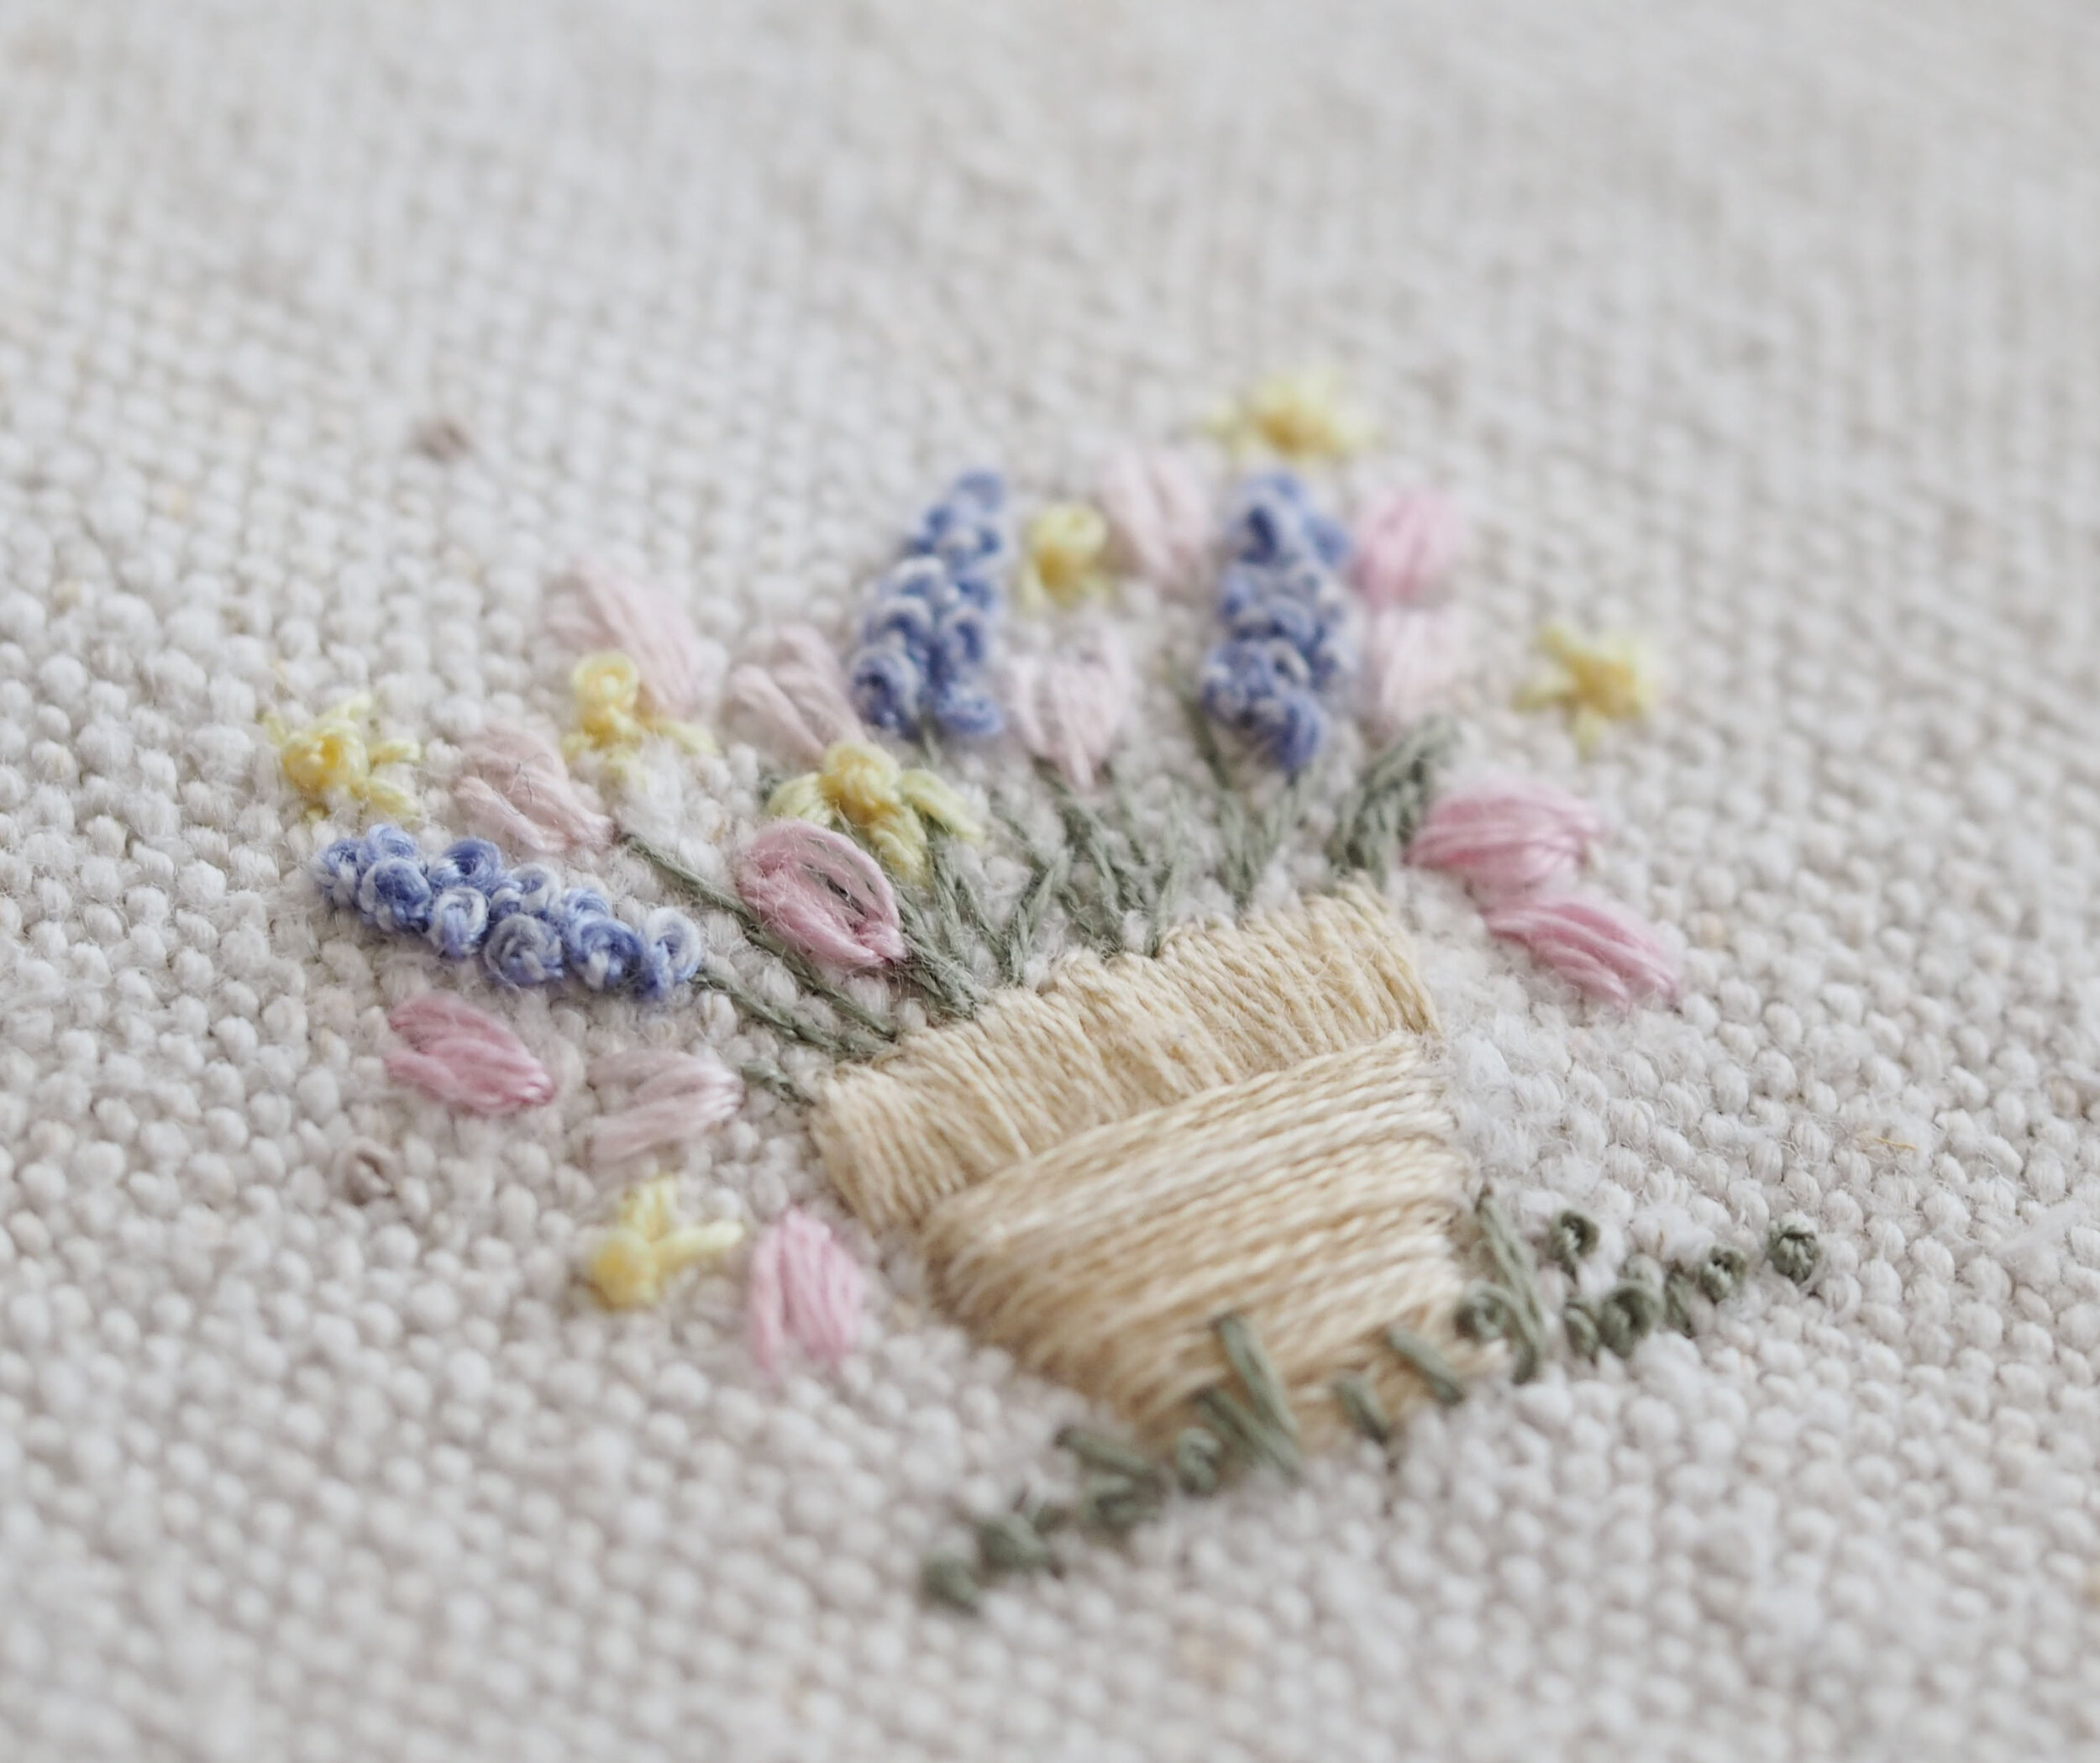
It isn’t often I share the things I am stitching because I am usually working on something secret for one of the subscription kits. However, as I worked on the March Haven kit I decided to lift a tiny motif from the design that I thought would be nice stitched for a homemade Mother’s Day or Easter card. You could, of course, also make it into a tiny lavender pillow. (If you do make this into a lavender pillow I would recommend using a larger square of fabric - I love a tiny motif with a lot of negative space around it.)

We could do with a little cheering up, am I right? And if we have to stay at home we may as well be stitching!

The possibility of being quarantined here in the UK feels very real and I have huge sympathy for my Italian friends at the moment. (Please pop over to my friend Cristina Embroidery Therapy on Instagram to say hi and cheer her up!)

Let’s get started and stitch away our troubles!

SPRINGPOT1.jpg

STITCH INSTRUCTIONS

You will need:

  • 5’ square of linen (I used a slubby antique hemp).

  • 4” embroidery hoop.

  • Sharp embroidery scissors.

  • A size 7 crewel needle.

  • Stranded embroidery cotton: Dark pink, light pink, yellow, mid-green, beige, dark blue and light blue. I used DMC.

Download and trace the attached pdf (file at the foot of the page).

Begin with the stems of the flowers. Use one strand of mid-green thread and make small back stitches from the pot up towards the base of the flowers. For the thicker leaves, make columns of back stitches close to each other to fill in the shape. Layer your flowers on top of the stems.

Next stitch the hyacinths. Thread your needle with one strand of dark blue (a nice purply blue is good for this) and one strand of light blue thread. Make French knots to fill the shape, tapering towards the tip of the flower head. Wrap twice around the needle.

I made tulips in two different shades of pink; one very pale pink and one sugary pink. Use two strands of pink thread and make an open lazy daisy stitch with the catch at the base of the flower, near the stem. (You can see this more clearly in my March video on Youtube.) Fill the open stitch with one or two straight stitches.

For the daffodils use two strands of yellow thread and make tiny star shapes with straight stitches. Pop a French knot in the centre, wrapping twice around the needle. To achieve the appearance of a daffodil in profile, stitch just three or four petals with the French knot to the side of them.

Work the pot outlines with two strands of beige thread using a very small split stitch. Fill with a rough satin stitch using one strand of thread. I worked the rim of the pot in vertical satin stitches and the base in horizontal stitches, to add interest. Make little straight stitches at the bottom of the pot to suggest grass. I added a couple of French knots too, only wrapping once.

Remove the pen lines, press face down on a fluffy towel, and you’re done!

I hope everyone is staying well and healthy. We’ve resigned ourselves to the fact that we need to stay home for a little while and stocked up yesterday on kindling, bread, milk and treats so that we can do our bit (however small) to help slow the spread of this nasty virus.

With love for a happy weekend,

Nicki xxx

You can trace from your laptop, tablet or phone. Just ensure that the image is the correct size - it is tiny - 3cm at its highest point. Use an erasable pen to trace onto the linen. If your fabric is too thick to see through, trace with the old-fashioned tracing paper technique: trace, turn paper over, trace reverse with a soft pencil, turn back the right way and trace onto fabric, pressing hard with pencil.

Kindred Spirits: A New Embroidery Design

P3092367.jpg

The Stitchery is on the move! At the beginning of the year it became glaringly obvious that we need more space and more help. Currently I work full-time with my sister helping part-time during school hours and my husband helping with accounts in the evening. Daily orders have increased and keeping on top of them, sending them in good time, has become a full-time occupation, not to mention the despatch of monthly and quarterly subscription kits. With the quantity of kits now in stock, and preparation for the Festival of Quilts and Handmade Festival later in the year (E X C I T E D), we need more space for stock too.

With a little sadness I gave notice to my Landlord on my pretty little studio in beautiful Castle Ashby and I have signed the contract on a much bigger unit in the heart of Northampton, not far from the train station.

Moving is expensive; I have a large rent deposit to pay upfront (four months’ worth), removal van costs and then the furniture and equipment to kit out the space. We started to look at options for generating the funds and, not wanting to borrow money, I decided on a Kickstarter campaign.

Kickstarter is fairly new on my radar. It is a way of generating funds for a project without asking for a loan, formal investment or donations. Customers ‘pledge’ a specific amount of their choice and in return receive a ‘free’ item/s further down the line. You can read more on my kickstarter page here. As an example, if you pledge £12 you receive an enamel pin badge (which are quite the thing these days! Lovely popped onto a craft tote bag or project bag). If you pledge £50 you receive an exclusive embroidery kit. As you move higher up the pledge value, the ‘rewards’ (items you receive) become even better value for money. Given that my embroidery cushion kits retail at £50 anyway, you are really just pre-ordering a kit but showing your support for this new venture in doing so.

As I binge-watched Anne with an E this Winter, I smiled to myself as Anne enthused over the Kindred Spirits she met. It made me think of my Stitchery customers and me; so many times I have met new women through my workshops and stitch club and immediately felt that I have found a Kindred Spirit. Indeed, lots of people have said the same to me.

At a time when social media can feel like a pretty angry place to be, it is comforting to know that there is a supportive and joyful community connecting over the gentle occupation of stitching. Anne makes a piece of textile art for her friend Diane with the words ‘Kindred Spirits’ to honour their friendship and this inspired my Kindred Spirits design.

“Kindred spirits are not so scarce as I used to think. It’s splendid to find out there are so many of them in the world.” L. M. Montgomery, Anne of Green Gables

“Kindred spirits are not so scarce as I used to think. It’s splendid to find out there are so many of them in the world.” L. M. Montgomery, Anne of Green Gables

The embroidery kit, which is only available to backers of the Kickstarter campaign, is going to be a cushion cover kit. I am still working on the sample and plan to share progress via my blog, newsletter and social media feeds, which I hope will be at least mildly interesting! I have chosen a very soft, gentle colour palette so that the cushion will complement most home decor schemes; the hope is that you will stitch this for yourself or make it as a lovely gift for a dear friend.

There will be ample linen in the kit to create an envelope closure cushion cover with torn linen ties for extra pretty detail if you wish. If you are not a machinist then you could easily frame the design - it would make a nice piece of hoop art - and use the remaining linen for other embroidery projects. The kit will, of course, use antique linen and quality DMC threads just like all of the other Stitchery kits (with this one in Special Edition packaging).

If you would like to pre-order the embroidery kit by way of Kickstarter pledge, please click here and follow the instructions to BACK THIS PROJECT (the green button). You will need to pay via card and your pledge details are kept anonymous from other people. The details you input will ONLY be used for the Kickstarter campaign, there are very strict rules that we have to adhere to in accordance with Kickstarter’s policies and that involves not using your details for anything other than fulfilling your reward.

If you have any questions regarding the Kickstarter project, please let me know. I am building an FAQ page and your question might be one that someone else wants to ask!

newspace.jpg
P1031646.jpg
IMG_5924.JPG

I have lots of plans for the new space; it is essentially a long, light and airy, room with a kitchen area and partitioned little office. I will have a large but cosy workspace for workshops and stitch clubs, a production area for cutting fabric and making up kits as well as a permanent show stand mock-up to provide a little shop area for visitors.

There are some exciting new tutors to coming to teach in the Autumn and work is underway on some beautiful collaborations too. Amongst many more embroidery kits, my sketch book holds a quilt design alongside wallhangings and ideas for all kinds of other lovely projects that can be hand-sewn in front of the television or when you travel.

More help will mean more time on my hands which I can spend updating the blog and creating video content. I have wanted to join the vlogging community for a long time now and I will do that as soon as we get the keys to the unit, so that I can share my journey in glorious, messy, technicolour!

Thank you for all of your support and kind words to date, I am so proud of the stitching community and love sharing my skills and ideas with you.

Have a great week,

Nicki